

Should The Torn Drywall Be Repaired Before Or After Installing The New Countertop
Most homeowners will need to install or repair some drywall at some point in their homeowning life. It can be quite intimidating, cutting into the "skin" of your home.
 View in gallery
 But if yous're careful and aware of the basic ideas backside how to install drywall, it really is pretty piece of cake. We like the idea of starting in an expanse like a kitchen backsplash considering, although you must measure and cutting and install with care to provide a flat workable vertical surface, the bulk of your drywall work will be covered up with a gorgeous backsplash. So it takes a bit of the pressure level off, don't yous recollect?
 View in gallery
 Here's a step-by-pace guide on installing (or repairing) drywall, particularly aimed at doing it for a kitchen backsplash. (Of class, the general guidelines are the same pretty much anywhere, and so this tutorial will help yous with about of your sheetrock-installing needs.) Please note that the photos throughout this article show unlike sections of the kitchen's drywall, due to lighting and other photographic constraints.
DIY Level: Intermediate to install or repair a drywall
 View in gallery
 Materials you'll need to install or repair drywall:
- razor bract
- drywall screws and drill
- putty pocketknife / trowel
- joint compound (likewise known every bit "drywall mud")
- drywall tape
- sanding cake – fine to medium
- spray texture
- primer& paint
How to install or repair drywall:
 View in gallery
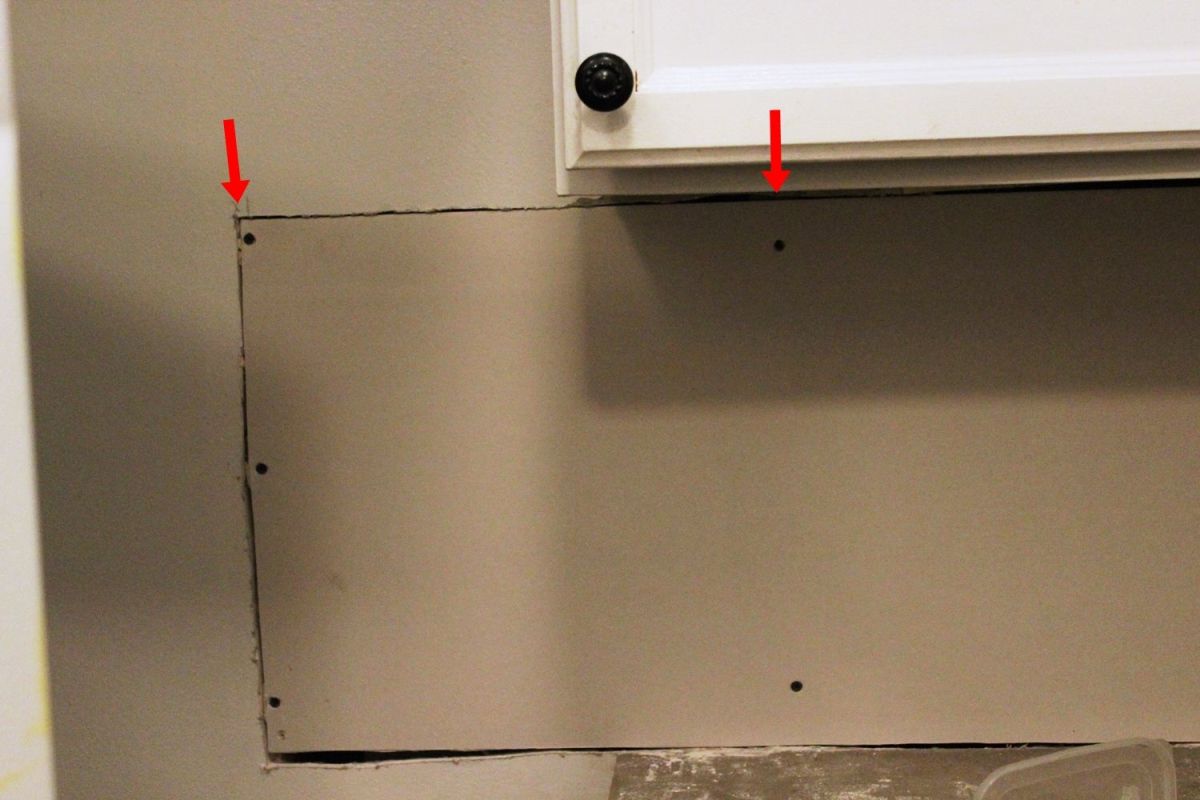
 In society to be able to install drywall correctly, you'll need to make certain that all the vertical edges of the drywall itself can be screwed to a framing 2×4. Even if this means cut your sheetrock further than you might need, or want, to cut it.
The edge of the existing drywall in the photo above ends correct at the edge of a 2×4 (which means one side of the drywall would be "floating" freely – not good), so we'll need to cut it back to the adjacent framing stud.
 View in gallery
 The red line in the photograph in a higher place represents where the ii×4 is. Observe we have cut halfway over the 2×4, and so both the remaining drywall and the new drywall piece can be screwed securely to the 2×iv.
 View in gallery
 You may use a razor blade (box cutter, x-acto pocketknife, whatever you call it) to get a clean cut on the drywall.
 View in gallery
 Use a box cutter to cut the drywall corners make clean and square.
 View in gallery
 Make certain everything that would prohibit the new drywall from lying apartment against the framing studs is gone. Have out any screws or nails, if there are any. Also scrape away any residual gunk, including glue or whatever else. The 2x4s should be free and clear.
 View in gallery
 In the event that y'all see space where it's impossible to cut the drywall at a halfway betoken on a stud (such as this space above the kitchen sink, for example, where the framing doesn't match upwards with the cupboards), you'll need to install 2×iv back up.
 View in gallery
 After measuring the top of your space likewise as the distance from that space to the nearest framing stud, y'all'll need to cutting 2x4s according to those measurements. In this example, that required an 18" 2×4 (for the elevation) and 2 5" 2x4s (for the distance from the nearest ii×4).
 View in gallery
 Begin by screwing in the two shorter pieces to the nearest framing stud. We used a diagonal screw management for zipper, two screws per piece.
 View in gallery
 Next, you'll need to attach your 2×four length to the two shorter pieces you just installed. Use a nail gun if you lot have one, or screws, or good old-fashioned hammer-and-nails.
 View in gallery
 As you lot can see from the photo higher up, installing this 2×4 to the infinite volition allow the new drywall to be secured on the sides. This is disquisitional for long-term back up; if a drywall edge is left floating, information technology will bend and warp and potentially crack…forth with anything that is installed on top of it (like backsplash tiles).
 View in gallery
 Repeat this step in every bit many areas every bit you demand to ensure 2×four framing support on the vertical axes of your new drywall.
 View in gallery
 At this indicate, you lot are ready to measure, cut, and fit your new drywall pieces to your infinite. Drywall sheets typically come up in viii' lengths (12' lengths are available every bit well but are much more troublesome to ship and manage for the average homeowner).
Measure out so that each drywall piece starts/ends on a stud, even if information technology means cutting a little length off a longer drywall piece and adding in a 2nd slice. Merely measure all walls.
The wall in the photo above, with the red line, measured 8' ½" long. Knowing this, nosotros were able to install the adjoining drywall showtime, which took away ½" because the new drywall is ½" thick. This made the red line wall an verbal 8' long – much easier to work with.
 View in gallery
 Measure and pencil in your measurements on the drywall. Use a box cutter to score the exposed (not-brown) side of the sheetrock.
 View in gallery
 Advisedly bend the sheetrock along the scored line.
 View in gallery
 Pull the sheetrock all the way downwardly to separate the inner stuff.
 View in gallery
 Keeping the sheetrock aptitude, you tin use a box cutter to cut through the back layer. Try to keep your cuts make clean, but don't worry if they're non perfect or if the paper backing rips a lilliputian bit. It shouldn't bear on your install.
 View in gallery
 Along with measuring the sheetrock perimeter, yous'll want to measure and cut out spaces for any electrical switches or outlets. Again, mensurate, draw, and score these spaces.
 View in gallery
 Utilize a hammer or the back finish of a drywall knife to pop out the middle and create a drywall hole.
 View in gallery
 A drywall knife is the easiest tool to use here for cleaning upwards your edges and corners.
 View in gallery
 Test-fit your drywall piece. Make sure all edges and corners lie apartment and that any electrical considerations are made accurately. If the drywall doesn't lie flush, pull it off and apply a drywall pocketknife to "shave" the necessary edges until it does fit.
 View in gallery
 Aim for a fairly shut fit around electrical outlets and switches, although if you're a little off, it'due south okay. Think that the electrical plate volition cover upwardly a piffling of the border, and so you accept a bit of a safety zone.
 View in gallery
 Corners are good here. If your corners aren't lying flat, double check to make certain the old drywall corner is cut make clean; it's like shooting fish in a barrel to overlook an one-time hunk of drywall in the corners, which keeps the new piece from lying flush.
 View in gallery
 When all looks skillful, pull the drywall away from the wall just a couple of inches and so you can marker the studs. This makes it much faster and easier to spiral the drywall in in one case it's upward there for proficient.
 View in gallery
 Screw in the new piece of drywall along the studs that you've marked.
View in gallery Mensurate advisedly and cut carefully, and your drywall should become up adequately easily and quickly. If there are gaps betwixt your drywall pieces just y'all're planning on installing a backsplash over them, yous won't even demand to worry about taping and mudding them.
 View in gallery
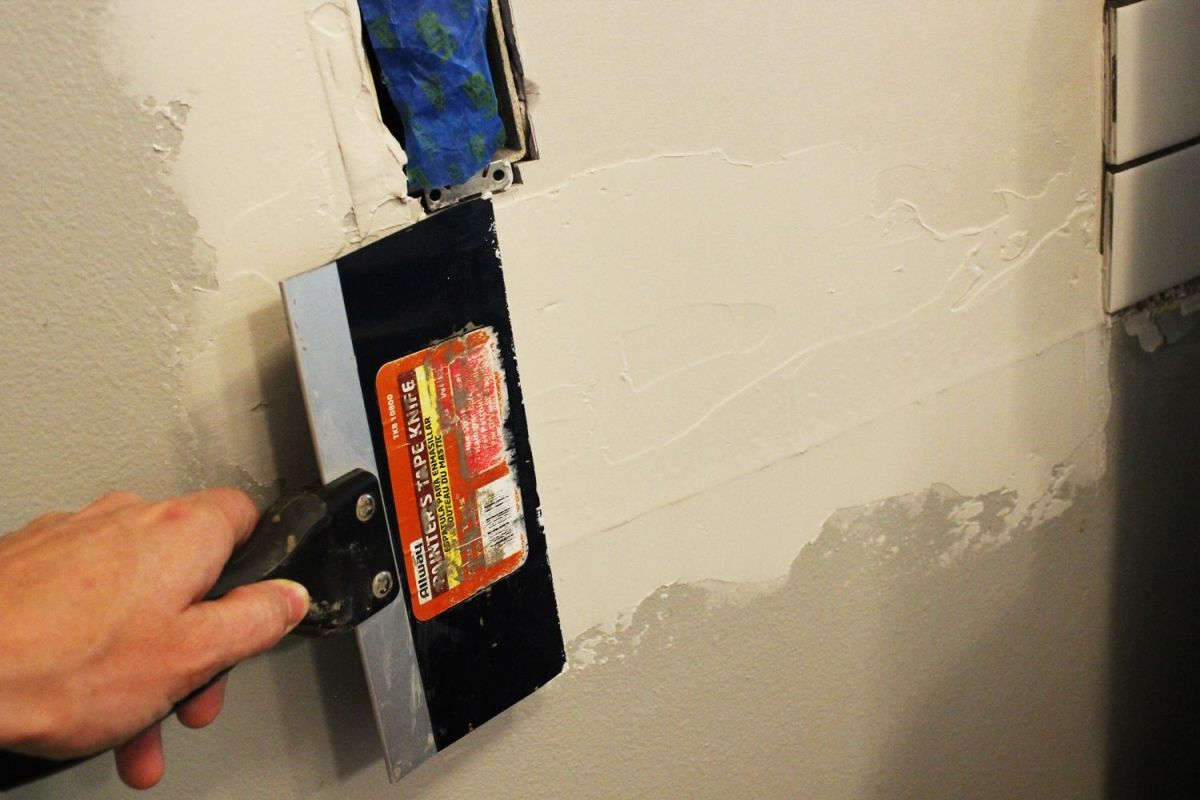
 When the drywall is screwed into place, information technology'southward time to mud and tape. Y'all'll want some drywall tape, joint compound (also known as drywall mud), a fine to medium sanding block, a putty knife and larger trowel, and gloves (optional).
 View in gallery
 If you've never washed this before and have the option, cull a department of drywall that's somewhat hidden to be your "practice" department. This item section is behind the refrigerator.
 View in gallery
 Begin by spreading your joint compound over the cracks.
 View in gallery
 The goal here is to fill the crack enough to create a smooth, seamless surface.
 View in gallery
 You lot can as well apply a larger trowel-blazon spreader for the mud. A larger 1 such as this helps to shine the mud more cleanly.
 View in gallery
 You want the joint compound to be thick enough to be able to sand down afterwards, merely not then thick that it takes forever to sand downward afterward.
 View in gallery
 Cut a piece of drywall record that'southward long plenty to run along one seam, from ane corner to some other.
Related: Best Drywall Patch Kit for Your Home Repair Projects
 View in gallery
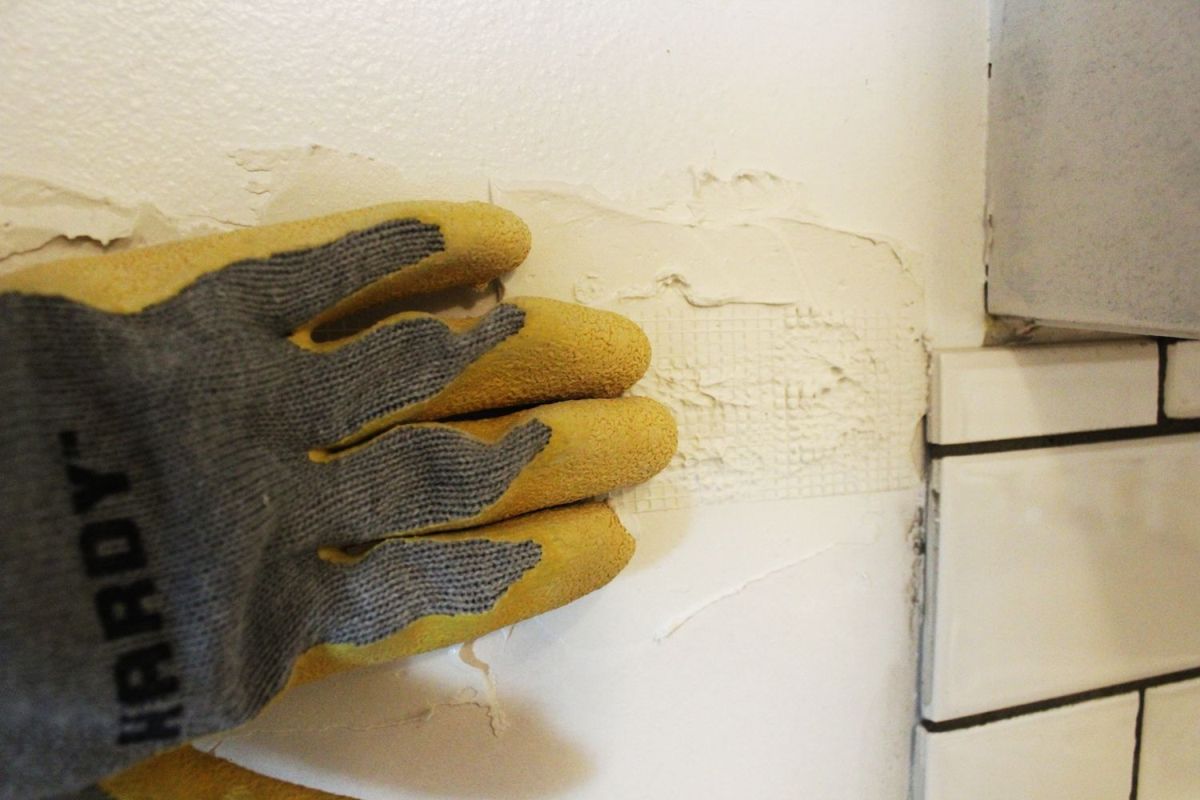
 Place the tape gently on the wet joint compound directly over the seam.
 View in gallery
 Push the record into the joint compound. You want all the mesh to sink into the chemical compound, creating a strong back up when the chemical compound dries.
 View in gallery
 Later the tape is pushed into the chemical compound, put a niggling more wet compound onto your putty pocketknife and run it over the tape once again.
 View in gallery
 Doing this might expose some of the record'south "grid" lines.
 View in gallery
 Add a little more than compound so those grid lines are covered up, but add just enough to cover them (non too much – you want layers to be equally sparse as possible).
 View in gallery
 Let joint chemical compound dry. Information technology make accept a while – fifty-fifty 24 hours, depending on the thickness of the mud.
 View in gallery
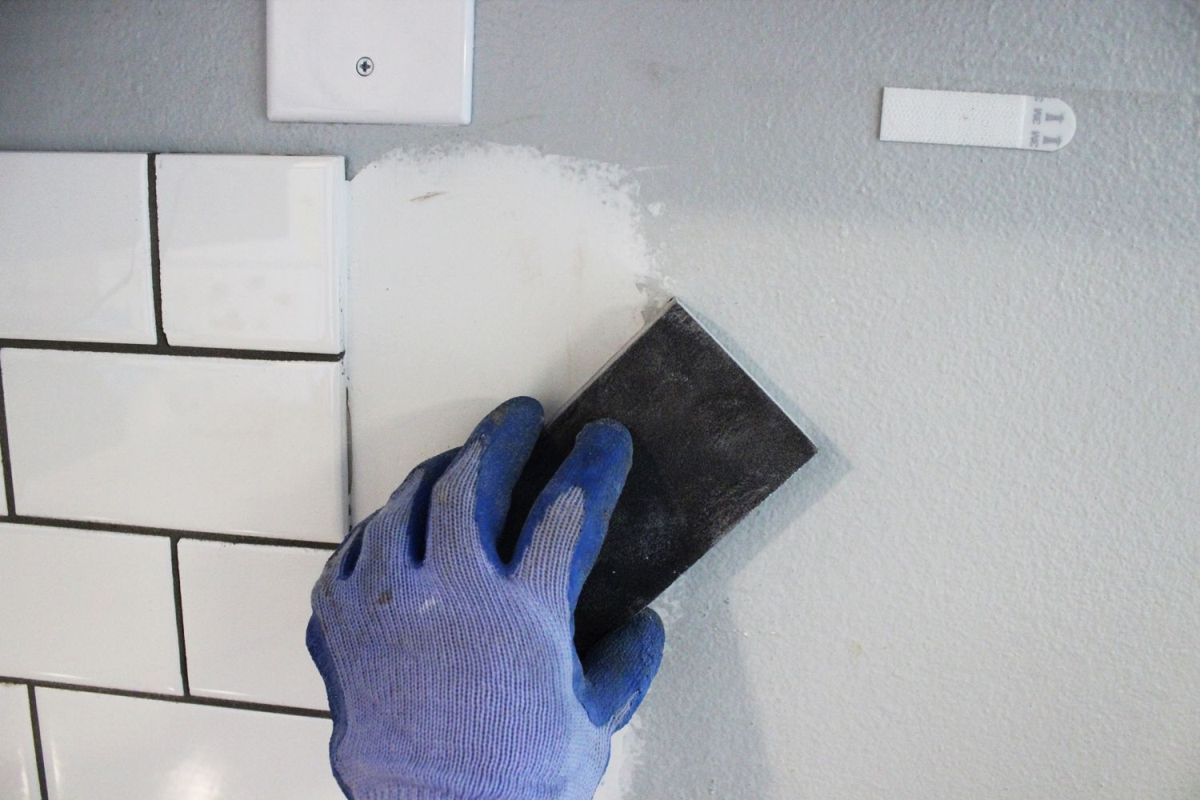
 When articulation compound is completely dry, gently sand it smooth with a fine sanding block.
 View in gallery
 Tip: Angle the cake to taper the joint compound toward the wall and then as to minimize the possibility of exposing the drywall tape.
 View in gallery
 If yous discover irregularities, pockets, cracks, or if the drywall record grid is exposed, repeat the application steps with very sparse coats until the wall is smooth and seamless.
 View in gallery
 This is a messy process; exist sure to vacuum your workspace every bit you become so as to avoid tracking the mud dust everywhere.
 View in gallery
 If your walls are textured, y'all'll need to friction match the flat new drywall to the balance of your walls past adding similar texture. To practise this, begin by taping off whatsoever nearby surfaces that you DON'T want textured. This includes countertops, backsplashes, cabinets, etc. Fifty-fifty electrical outlets and like should be covered.
 View in gallery
 Spray textures are available at your local home improvement store. These are ii examples. I have constitute both to work as well.
Related: Don't Settle for Drywall –Go for These Crawly Finishes Instead
 View in gallery
 Adjust the settings on your spray texture as per the can's instructions, and then exercise spraying on a not-wall surface. When you have the right spray, yous're gear up to do the wall.
 View in gallery
 Make several light passes with the spray texture over the new drywall surface, keeping the spray tin can about ii anxiety away from your wall. (The method is similar to spray painting – do quick, light strokes. Y'all can ever fill in more after.) When your texture matches the surrounding walls, stop spraying and let it dry out.
 View in gallery
 Prime and paint the newly drywalled and textured wall. Congratulations on your seamless drywall installation!
Annotation: The author is an experienced, although not professional, habitation improvement enthusiast. Homedit is non responsible for whatever injuries or amercement caused as a event of this tutorial.

Should The Torn Drywall Be Repaired Before Or After Installing The New Countertop,
Source: https://www.homedit.com/install-or-repair-drywall/
Posted by: anguloyoulderven.blogspot.com
0 Response to "Should The Torn Drywall Be Repaired Before Or After Installing The New Countertop"
Post a Comment